
CODE PAGE
NODE WITH DATABASE
Here is how you can access a database (MySQL) with NodeJS. We will use cPanel to set things up. cPanel is a very common server admin system.
- Login to cPanel https://cpanel.dev.fast.sheridanc.on.ca/
- Use your Sheridan username and password
- Go to Databases and firstly choose MySQL Databases
- Firstly, Create New Database called wp (your username is a prefix)
- Scroll down and under MySQL Users add a Username
- Copy the password as we will use it in our code.
- Add User to Database and just give it all permissions.
- Secondly, back on the cPanel front choose phpMyAdmin
- Select your database username_wp at the top left
- Under Create New Table
- Call the table node (lowercase) with 4 columns
- Press the Create button
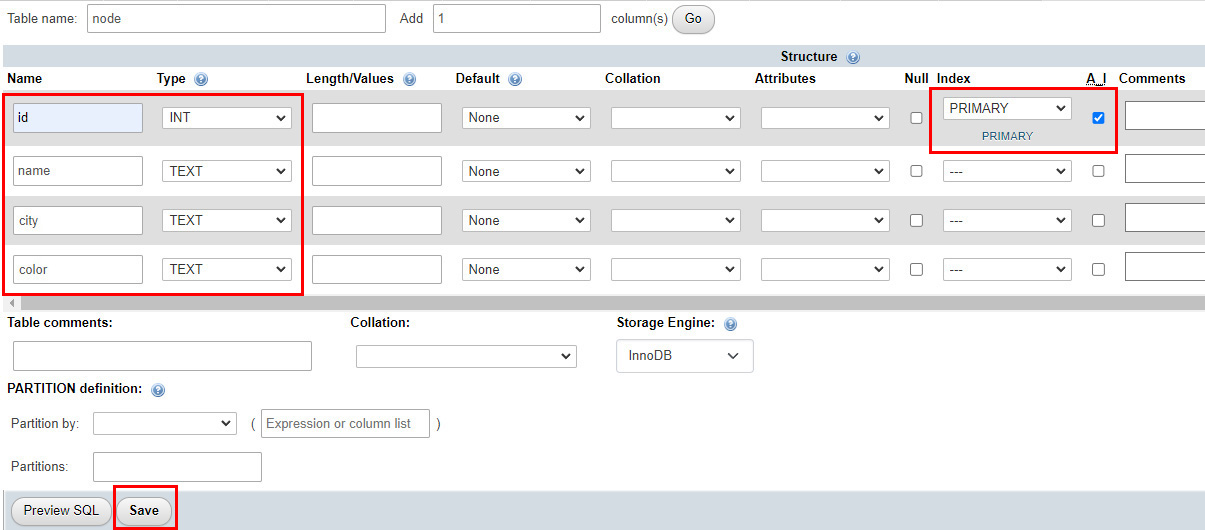
- Add id (INT), name, city, color (TEXT)
- Make the id A_I (Auto Incrementing) and PRIMARY
- Press Save
- Select Insert from the top Tabs
- Add a record to your table (do NOT fill in id)
- Choose Browse to see your data in the table
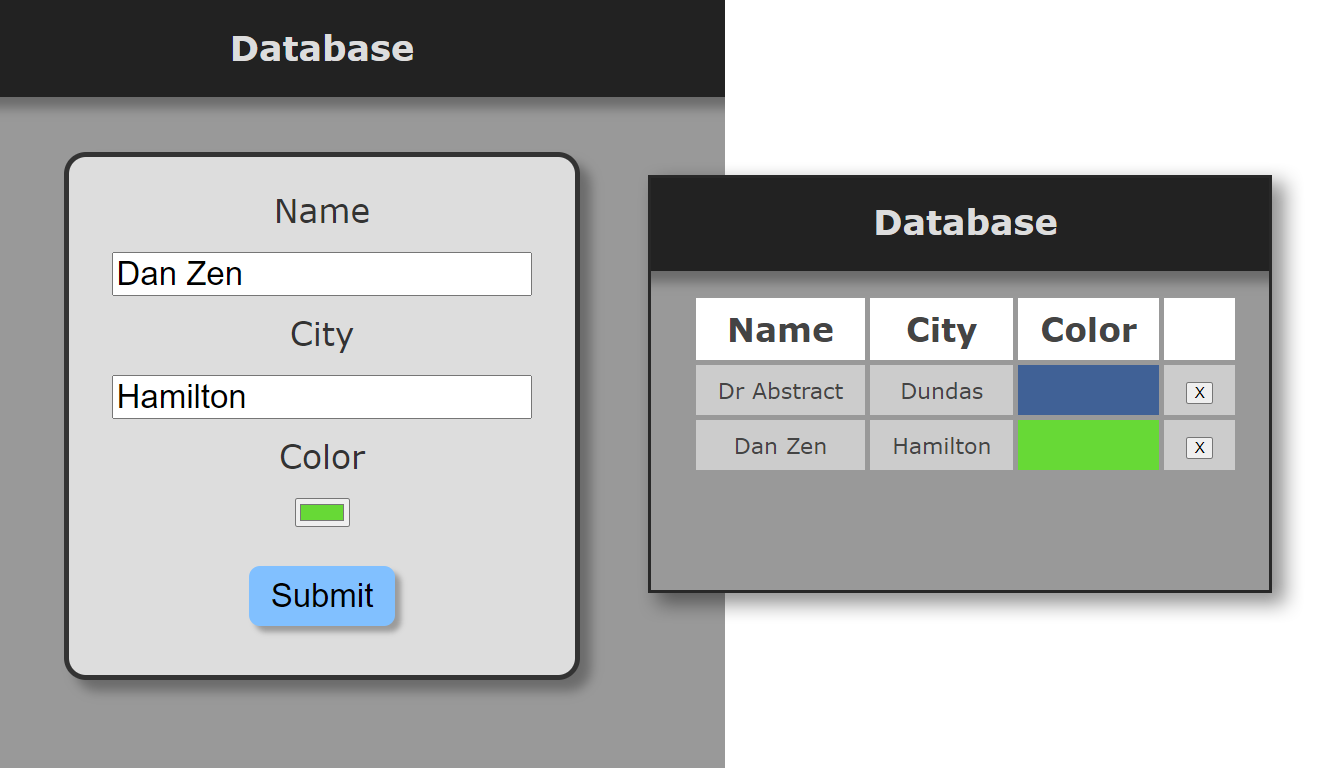
- We will make an app that stores a name, city and color
- It will show a table of results
- And make it so we can delete any result
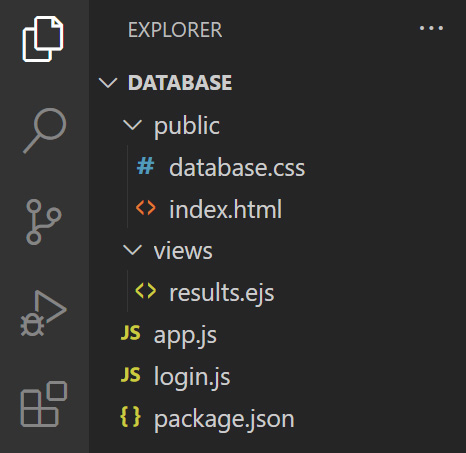
- Make a folder called database/ on in your Web Programming directory
- Add the following folders and files by copying from the Database ZIP
- Here is what the folder structure looks like
- We will not npm install here - but rather do that on the server later
- Get the files from this DATABASE ZIP
- public/database.css
- public/index.html
- views/result.ejs
- app.js
- login.js
- package.json
- Use the Files > File Manager
- make an apps/ folder directly in your username folder
- Never put server files with passwords, etc. in the public_html
- open the apps/ folder and add all folders and files in your dababase/ folder
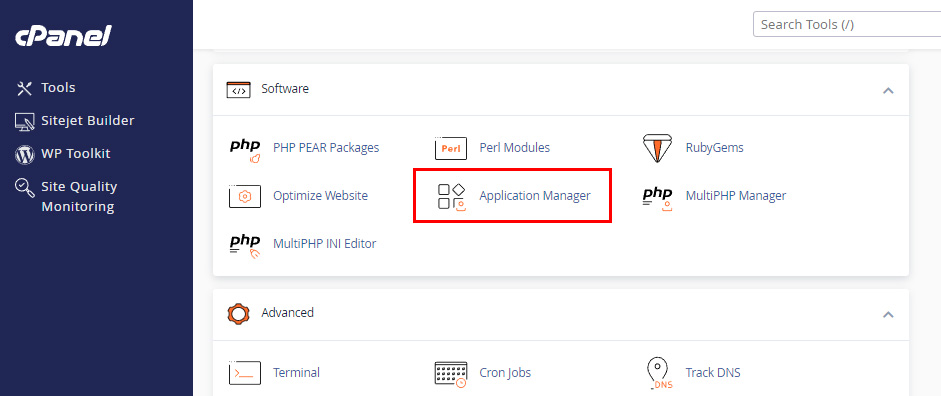
- In cPanel, scroll to Software, and select Application Manager
- Press Register Application
- Set the Application Name to Database
- Set the Deployment Domain pulldown to Your Domain
- Set the Base Application URL to database
- Set the Application Path to apps/database
- Choose Development while testing and Production when launching
- Ignore Environment Variables and press DEPLOY
- Press Ensure Dependencies to run npm install on the server
- This will do an npm install based on the package.json
- Make sure the App is Enabled so that it is running
- To make changes to the app you MUST upload the changes to the server
- And then Disable and Enable the app
- This will take about a minute to actually process before the change is live
- During that time, the app may hang or show errors
- Go to http://[username].dev.fast.sheridanc.on.ca/database
- Type in a name, city and choose a color
- Press Submit
- Try that a couple times
- Press the X next to an entry to delete
- A confirmation panel will show - press CONFIRM or CANCEL
- Do the database part last when building an app like this
- Get everything else working locally first
- Test with node init, npm install, nodemon, etc.
- Then upload to the server and hook the database up
- Watch out for typos in field names - keep them lowercase
- Remember to Disable and Enable the app to see changes
- Wendi has notes on how to see logs from the server
cPanel
DataBase
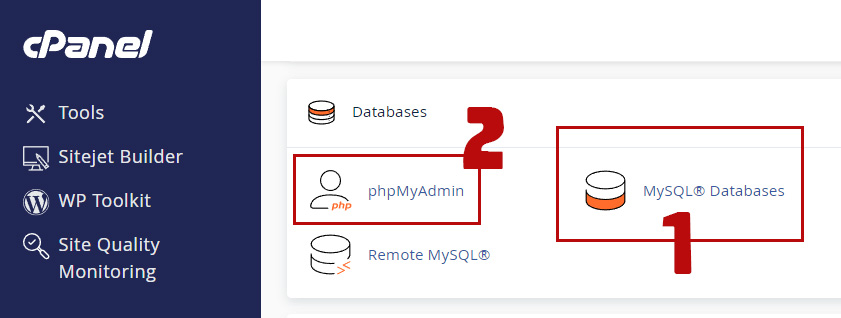
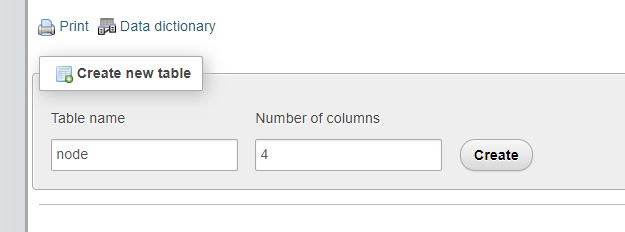
Table Fields
NODEJS APP
body {
    background-color:#999;
    font-family:verdana;
    color:#ddd;
    text-align: center;
    margin:0px;
}
header {
    margin:0px;
    padding:5px;
    background-color: #222;
    box-shadow: rgba(0,0,0,.3) 0px 10px 10px;
}
form {
    margin:10px;
    padding:30px;
    display:inline-block;
    border-radius: 20px;
    border:thick solid #333;
    background-color: #ddd;
    font-size:30px;
    color:#333;
    width:90%;
    max-width:400px;
    box-shadow: rgba(0,0,0,.3) 10px 10px 10px;
}
input {
    margin-top:20px;
    font-size:30px;
}
input[type=text], input[type=color] {
    margin-bottom:15px;
}
input[type=submit] {
    box-shadow: rgba(0,0,0,.3) 5px 5px 5px;
    padding:10px 20px;
    border:none;
    cursor:pointer;
    border-radius: 10px;
    background-color: rgb(129, 192, 255);
    margin-bottom:15px;
}
input[type=submit]:hover {
    background-color: rgb(181, 208, 255);
}
footer {
    margin:30px;
    font-size:24px
}
#welcome {
    font-size:24px;
    font-variant: small-caps;
    font-style: italic;
    margin:30px 0px -10px 0px;
}
table {
    margin:20px;
    display:inline-table;
    border-spacing:5px;
    color:#444
}
th {
    font-size:30px;
    padding:10px 20px;
    background-color: white;
}
td {
    font-size:20px;
    padding:10px 20px;
    background-color: #ccc;
}


/* CONFIRMATION PANEL */
#confirm {
    display:none;
    position: fixed;
    top: 50%;
    left: 50%;
    transform: translate(-50%, -50%);
    width:290px;
    padding:30px;
    text-align: center;
    background-color: yellow;
    border:medium solid #222;
    border-radius: 15px;
    box-shadow: rgb(0,0,0,.2) 10px 10px 10px;
}
#confirm button {
    padding:10px 20px;
    font-size:20px;
    border-radius:10px;
    cursor:pointer;
}
#delete {
    width:125px;
    text-align: center;
    margin-right:15px;
    background-color: red;
    color:white;
}
#delete:hover {
    background-color: rgb(255, 74, 74);
}
#cancel:hover {
    background-color: white;
}
<!doctype html>
<html lang="en">

<head>
    <meta charset="utf-8">
    <title>NodeJS with Database</title>
    <meta name="viewport" content="width=device-width, initial-scale=1.0">
    <link rel="stylesheet" href="database.css">
</head>

<body>

    <header>
        <h1>Database</h1>
    </header>

    <br><br>
    <form action="/database" method="post">

        <label for="name">Name
            <br>
            <input type="text" id="name" name="name" required>
        </label>
        <br>
        <label for="city">City
            <br>
            <input type="text" id="city" name="city" list="list" required>
        </label>
        <br>
        <label for="username">Color
            <br>
            <input type="color" id="color" name="color" required>
        </label>
        <br>
        <input type="submit">

        <datalist id="list">
            <option>Oakville</option>
            <option>Toronto</option>
            <option>Hamilton</option>
            <option>Brampton</option>
            <option>Mississauga</option>
            <option>Burlington</option>
        </datalist>

    </form>

</body>

</html>
<!doctype html>
<html lang="en">

<head>
    <meta charset="utf-8">
    <title>Results - NodeJS with Database</title>
    <meta name="viewport" content="width=device-width, initial-scale=1.0">
    <link rel="stylesheet" href="/database/database.css">
</head>

<body>

    <header>
        <h1>Database</h1>
    </header>

    <table>
        <tr>
            <th>Name</th><th>City</th><th>Color</th><th></th>
        </tr>
        <%
        results.forEach(row => {
        %>

        <tr>
            <td><%= row.name %></td>
            <td><%= row.city %></td>
            <td style="background-color:<%= row.color %>"></td>
            <td><button class="x" id=<%= row.id %>>X</button></td>
        </tr>
        <%
        });
        %>
    </table>

    <div id="confirm">
        <button id="delete">DELETE</button>
        <button id="cancel">CANCEL</button>
    </div>

    <script>

        // an html collection of all the delete buttons
        const buttons = document.getElementsByClassName("x");

        // add an event to each delete button
        let currentX;
        for (tag of buttons) {
            tag.addEventListener("click", e=>{
                confirm.style.display = "block";
                currentX = e.target;
            });
        }

        // confirmation pane
        const confirm = document.getElementById("confirm");
        const deleteBut = document.getElementById("delete");
        const cancelBut = document.getElementById("cancel");

        // the delete button on the confirm pane
        deleteBut.addEventListener("click", ()=>{

            // send the delete request to the server
            fetch("/database/delete", {
                method:"POST",
                headers: {"Content-Type": "application/json"},
                body: JSON.stringify({id:currentX.id})
            }).then(response=>{
                return response.json();
            }).then(data=>{
                if (data.error == "none") {
                    // hide the x button's tr tag
                    currentX.parentElement.parentElement.style.display = "none";
                    confirm.style.display = "none";
                } else {
                    showError();
                }
            }).catch(showError);
            function showError() {
                deleteBut.innerText = "ERROR";
                setTimeout(()=>{deleteBut.innerText = "DELETE"}, 1500);
            }

        });

        // the cancel button on the confirm pane
        cancelBut.addEventListener("click", ()=>{
            confirm.style.display = "none";
        });

    </script>


</body>

</html>
"use strict";

const express = require("express");
const app = express();
const path = require("path");

app.set("port", process.env.PORT || 3000);

// set the template engine
app.set("view engine", "ejs");

// import mysql - could use other database drivers like mongodb
const mysql = require('mysql');

// parse any post data
app.use(express.urlencoded({ extended: false }));

// parse any JSON data
app.use(express.json());


// COULD USE CONTROLLERS FOR THE CODE INSIDE POSTS

// LOGIN
// You can make one database for all your apps
// and make a table (or tables with prefixes) for each app
// then keep your user, pass and database in a login module
// that has the following code - this is all that is in login.js

// exports.user = "username";
// exports.pass = "password";
// exports.database = "database";

const login = require("./login");

app.post("/database", (req, res)=>{

    const connection = mysql.createConnection({
        host     : '127.0.0.1',
        user     : login.user,
        password : login.pass,
        database : login.database
    });

    connection.connect((error)=>{
        if (error) {res.send(error);}
    });

    // INSERT THE DATA
    connection.query(
        "INSERT INTO node(name, city, color) VALUES(?,?,?)",
        [req.body.name, req.body.city, req.body.color],
        (error, results, fields)=>{if (error) res.send(error);}
    );

    // SHOW THE DATA
    connection.query("SELECT * FROM node", (error, results, fields)=>{

        // // used this in testing
        // results.forEach((row)=>{
        //     output += row.name + " - " + row.color + " - " + row.city + "<br>";
        // });
        // res.send(output);

        if (error) {res.send(error);}

        res.render("results", { results: results }); // or in ES6 just { results }

    });

    // EDITING DATA
    // We are not editing data in this app (aside from deleting below)
    // You would edit with an SQL UPDATE query:
    // connection.query(
    //     "UPDATE node SET name=?, city=?, color=? WHERE id=?",
    //     [req.body.name, req.body.city, req.body.color, req.body.id],
    //     (error, results, fields)=>{if (error) res.send(error);}
    // );

    connection.end();

}); // end get database


// DELETING

app.post("/database/delete", (req, res)=>{

    const connection = mysql.createConnection({
        host     : '127.0.0.1',
        user     : login.user,
        password : login.pass,
        database : login.database
    });

    connection.connect((error)=>{
        if (error) res.json({"error":error});
    });

    // DELETE THE DATA
    connection.query(
        "DELETE FROM node WHERE id=?", [req.body.id], (error, results, fields)=>{
            if (error) res.json({"error":error});
            else res.json({"error":"none"});
        }
    );

    connection.end();

});

// this will load the index and css as if in database root
app.use("/database", express.static(path.join(__dirname, "public")));


app.listen(app.get("port"), ()=>{
    console.log("running on port " + app.get("port"));
});
// add your information here from cPanel
exports.user = "username_for_cPanel_mySQL";
exports.pass = "password_for_cPanel_mySQL";
exports.database = "username_database";
{
    "name": "database",
    "version": "1.0.0",
    "description": "",
    "main": "index.js",
    "scripts": {
        "test": "echo \"Error: no test specified\" && exit 1"
    },
    "author": "Dr Abstract",
    "license": "ISC",
    "dependencies": {
        "ejs": "^3.1.9",
        "express": "^4.19.0",
        "mysql": "^2.18.1"
    }
}
Upload Files
RUNNING APP IN CPANEL

TEST YOUR APP
DEBUGGING
FULL Sheridan Node documentation can be found in Wendi Jollymore's Lessons.